Workflows
Workflows are Tombolo's way of setting up a method for running a set of HPCC workunits, or jobs in a logical workflow.
Setup
To set up a workflow, go to the "Workflow" screen under the "Workflows" section of the left navigation. Once there, use the blue "add" button on the top right-hand side of the screen. Once there, fill out the fields, described below.
- Title - The title for the workflow.
- Description - The description of what is occuring in the workflow.
- Cluster - Which cluster the workflow will use
- Username & Password - The username and password that Tombolo will use to authenticate to the cluster and run the workflow under.
- Notify - Choose the notification condition that Tombolo will use to send out notifications related to workflow runs.
- Success - The message that Tombolo will use for notifications on a succesful workflow run.
- Failure - The message that Tombolo will use for notifications on a failed workflow run.
- Recipients - A List of emails that Tombolo will use for notifications on the Notify condition.
Designer
Tombolo's Workflow Designer utilizes an simple, low code approach to designing your Workflows. Simply click on the title of the workflow that you wish to edit and you will enter the workflow designer screen.
Designer UI
The workflow designer utilizes three main areas.
- Left Navigation - Here you will find your Asset nodes that you can drag onto the workflow designer screen
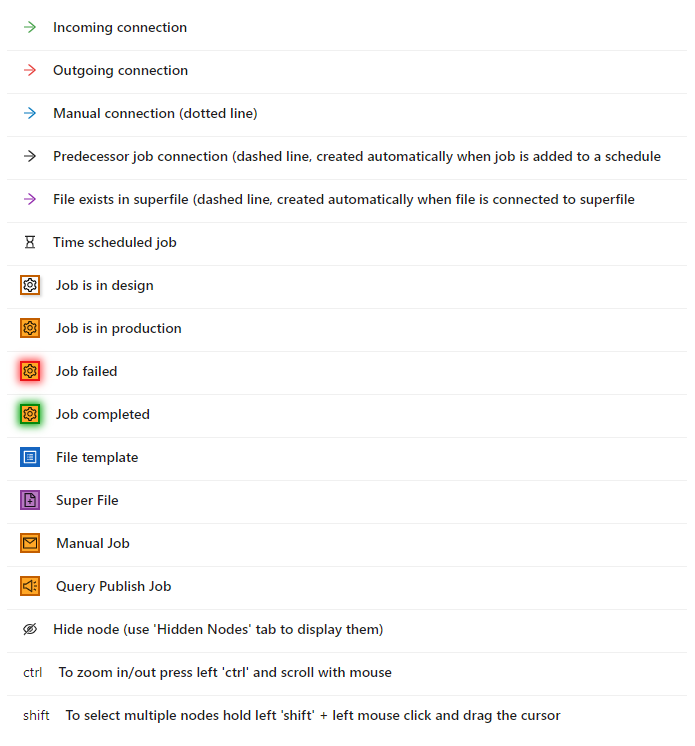
- Top Navigation - The top navigation contains several useful items, including versioning of your workflow, synchronizing, a version indicator, and an info dropdown which gives a description of the appearance of nodes and connections between them.
- Designer screen - The main screen where you will interact with nodes and set up the logical flow of your workflow.
Assets
On the left navigation bar, you will see the different assets that you can drag onto the designer screen to be utilized inside of the workflows. In order to use any of these, simply drag the node on to the designer screen and double click the node to select the desired asset to associate with that node.
- Job - Utilize the Jobs that you have uploaded as assets. Refer to the guide linked guide to upload Jobs.
- File - Utilize a File inside of the workflow. Refer to the assets guide for information on how to upload.
- Montiring - Utilize a File Template inside of the workflow. Refer to the assets guide for information on how to set this up.
- >Index - Utilize an Index inside of the workflow. Refer to the assets guide for information.
- Sub Process - Set up a sub-process to run during the workflow, seperate from the main workflow process.
Top Navigation
The top navigation contains several useful items, including versioning of your workflow, synchronizing, a version indicator, and an info dropdown which gives a description of the appearance of nodes and connections between them.
- Info Dropdown - a quick reference that provides a description of the connections, nodes, and indicators your will find on the designer screen.
- Hidden Nodes - a dropdown menu of all of the nodes that are currently hidden inside of the workflow.
- Synchronize - Using this will validate all of the file and job relationships and will update the graph accordingly, if necessary.
- Save Version - Overwrite the current version with the version of the graph currently on screen.
- Version Dropdown - Select the different versions of the workflow that you have saved in the past.
- Version Indicator - indicates which version of the workflow you are currently editing.
Designer Screen
The main screen where you will interact with nodes and set up the logical flow of your workflow. Simply drag items from the assets bar onto the screen to begin interacting. Each node that you drag onto the screen will have anchors on the 4 sides of the node that you can use to make a connection to adjacent nodes. Double clicking a node will open up a selection screen to select the desired asset of the same type that you wish to use for that node. Below is an image of the different node types and connections that you will find within the designer screen.
